Madokami Guide
Madokami is a private website that hosts manga, novels and artbooks. They upload the same manga rips found on nyaa without compression. You can either download from their site (upto 3 parallel downloads) or directly read in mihon & their forks using Keiyoushi repo extension. Open registrations are closed, but you can always join their IRC channel and try your luck at gacha rolling for an account.
Creating Account
IRC Clients
Install an IRC client, like HexChat for PC and Revolution IRC for Android. You can't use web clients, more options here.
Step 1
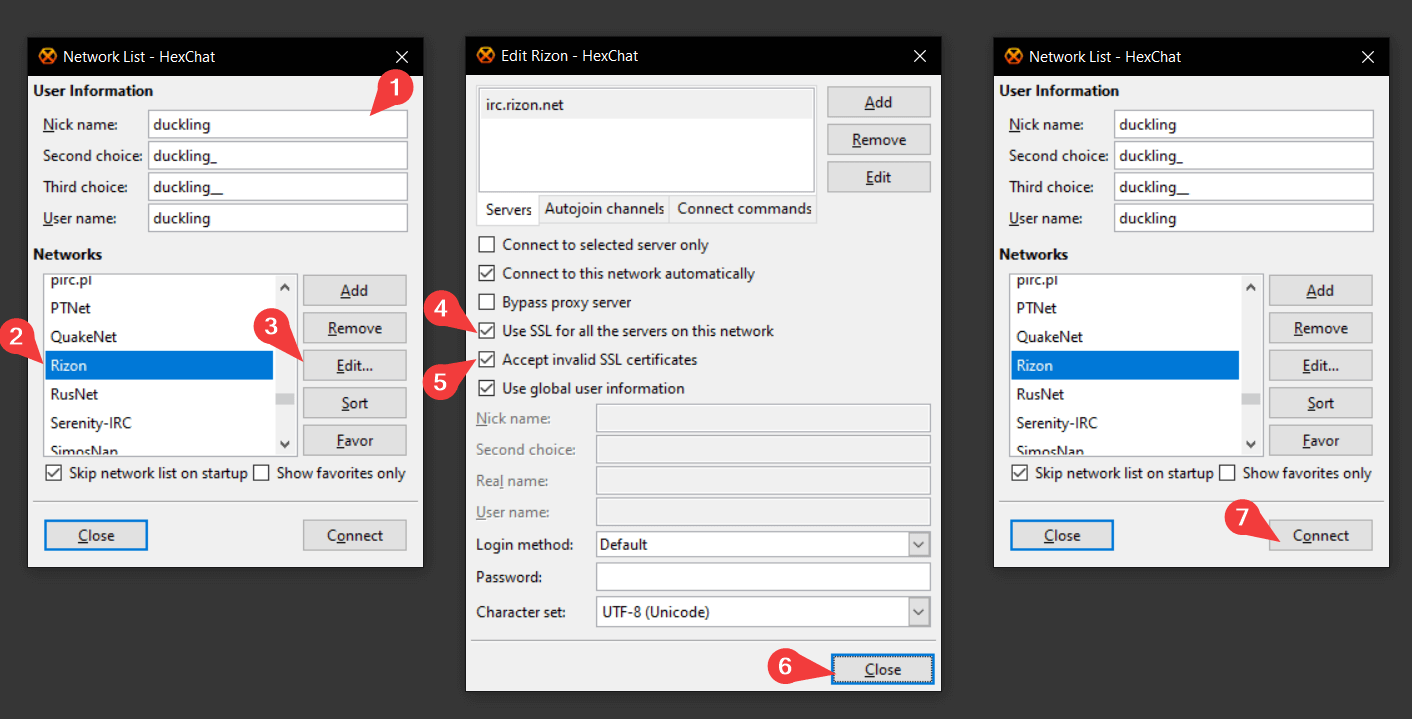
Connect to Rizon IRC network.
- Add nickname for your account
- Select Rizon in the network list
- Click Edit
- Enable Use SSL for all the servers on this network
- Enable Accept invalid SSL certificates
- Click Close
- Click Connect
For Revolution IRC
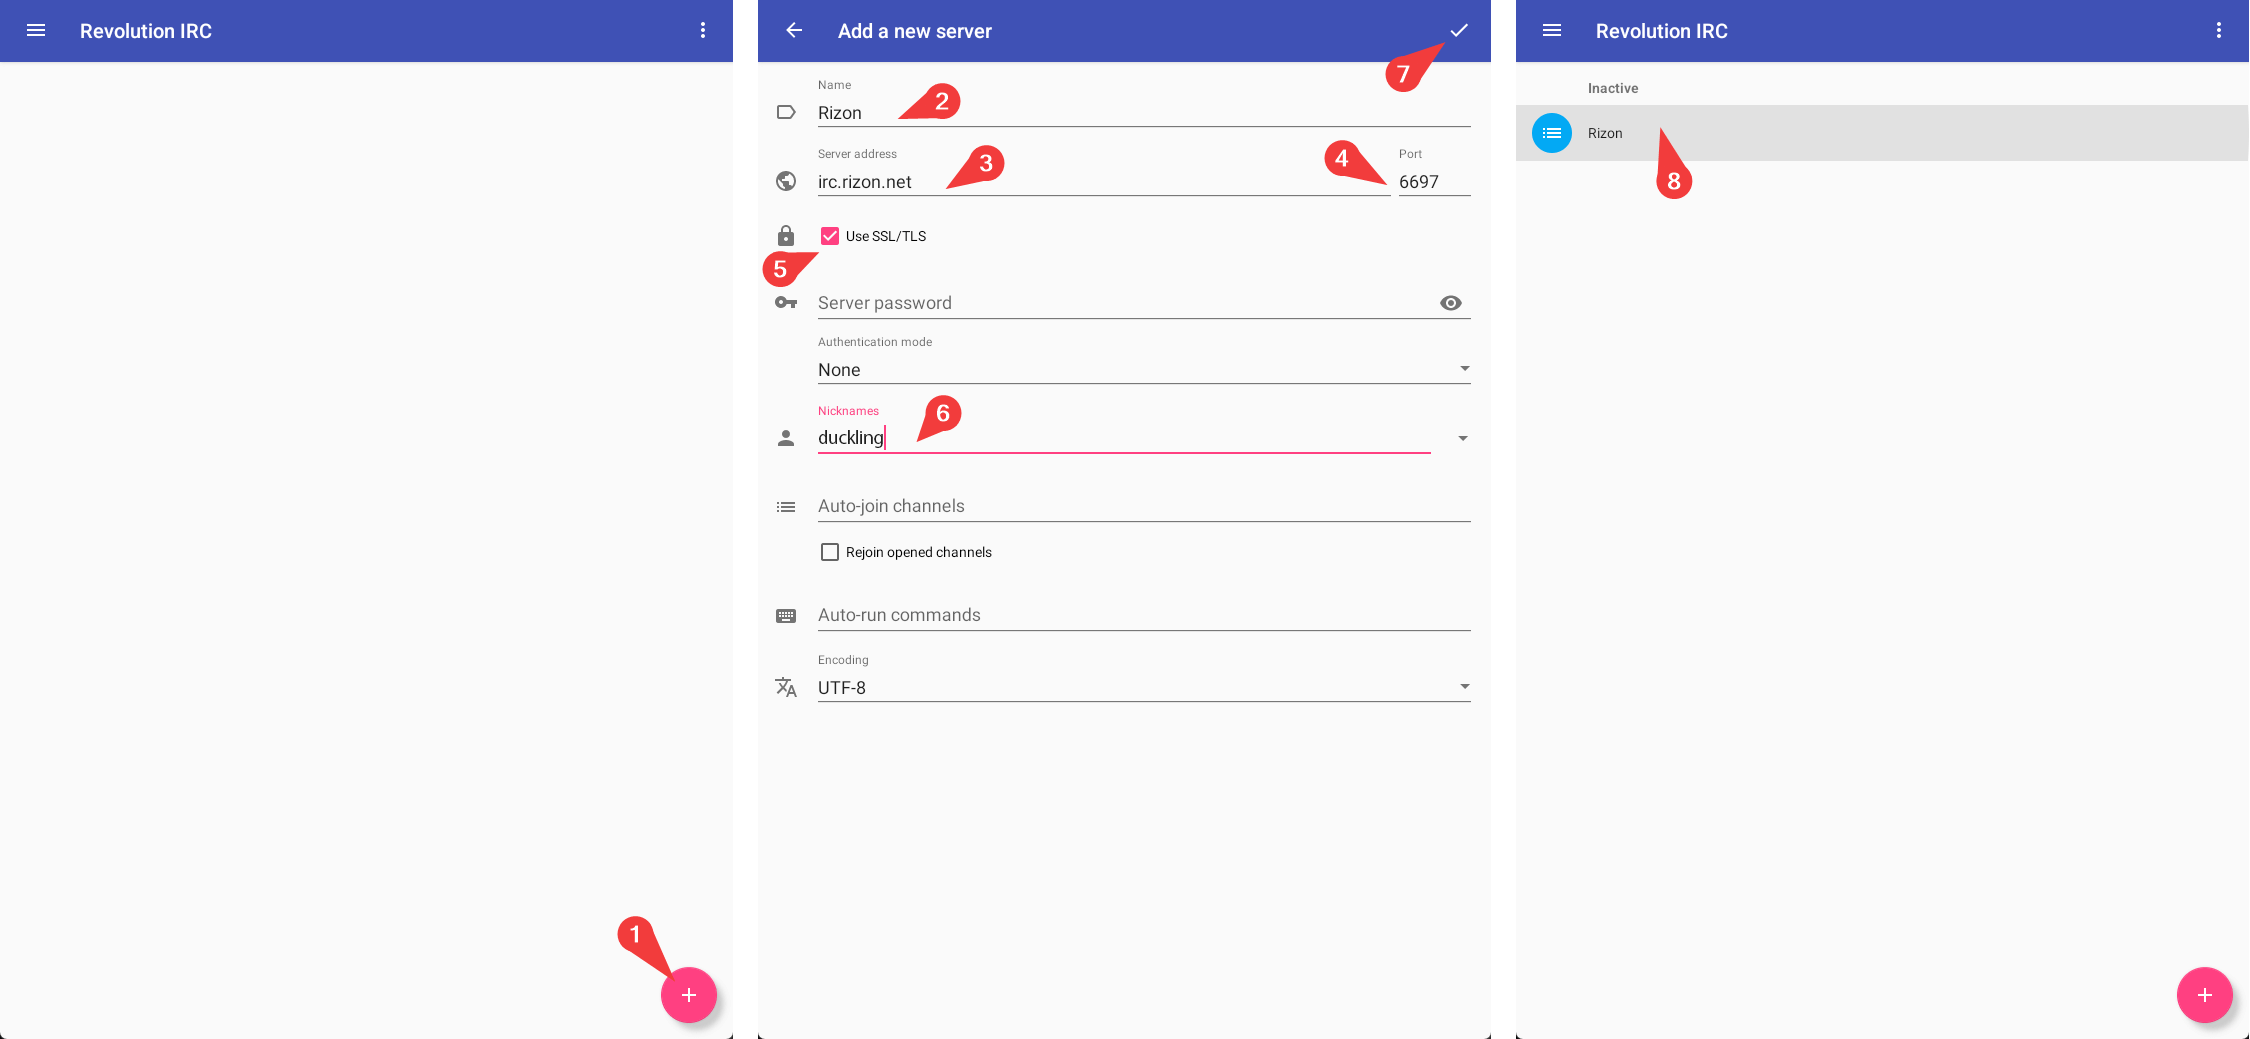
By default, Revolution IRC doesn't list any networks, so you will need to add Rizon manually by following these steps:
- Tap the button in the bottom right corner of the screen
- Set network name as
Rizon - Set server address as
irc.rizon.net - The port used is
6697by default, set it to9999in case of connection issues - Enable SSL/TLS
- Set your desired nickname
- Save the configuration
- You will now see the Rizon network on the main screen. Click on it to start the joining process
Step 2
Important
- Use a real e-mail address. Temporary and throw-away e-mail addresses are not acceptable.
- Check spam/junk folder too, if you don't see any reply in the inbox.
- Make sure that your password is longer than 5 characters
Register your current nickname by typing the following:
/msg NickServ REGISTER yourPassword [email protected]Now you should get a confirmation code like this
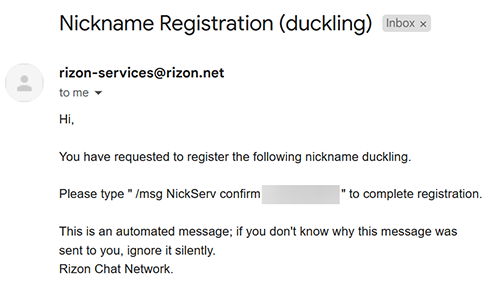
Copy and paste the confirmation code into the following command:
/msg NickServ CONFIRM ConfirmationCodeFromEmail
Now, your nickname is registered, and you've automatically been identified. You are eligible to join Madokami. Upon your next visit to Rizon IRC network, use the same nickname, and identify using the following command: /msg NickServ IDENTIFY yourPassword
Step 3
Type
/join #madokamiat the bottom command bar to join Madokami channel.Now type
/msg sola REGISTER username passwordin the Madokami channel. You shouldn't reuse the RIZON password here.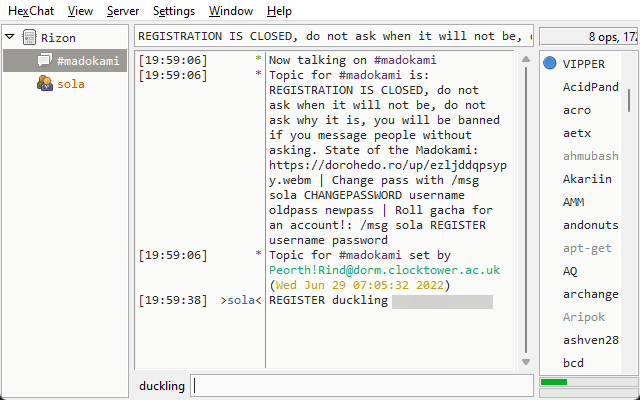
If everything worked, you will now see a sola tab on the left (or at the top on Android). Clicking on it, you will find the bot's reply. If it says that you aren't favored, you can try again after about 4 hours.

Possible Issues
If you've followed this guide perfectly, but still aren't getting a reply from sola in the side tab, try the following:
- Remove any special symbols from your nick, leaving only letters and numbers, or use a more unique nick (in case someone else already registered it).
- If you're using mobile data, switch to wi-fi.
Auto-join Madokami Channel
You can also set up your client to do this automatically by adding it to the Connect/Autorun commands for the Rizon network.
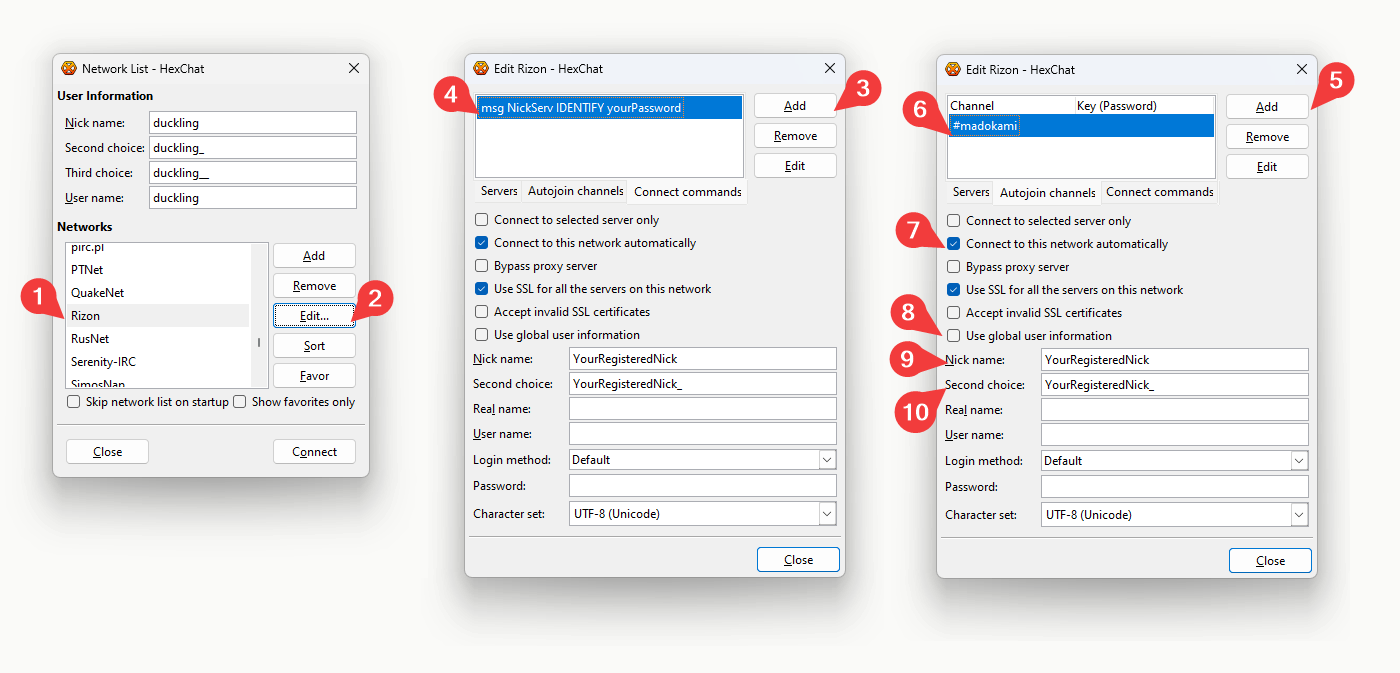
Hexchat
- Press
Ctrl + Sto open Network List & select Rizon in the network list - Click Edit
- In Connection Command, click on Add
- Add
msg NickServ IDENTIFY yourPassword - In Autojoin Channels, click on Add
- Add
#madokami - Check "Connect to this network automatically"
- Uncheck "Use global user information"
- In Nick name add your registered nickname
- In Second choice add your registered nickname with "_" at the end
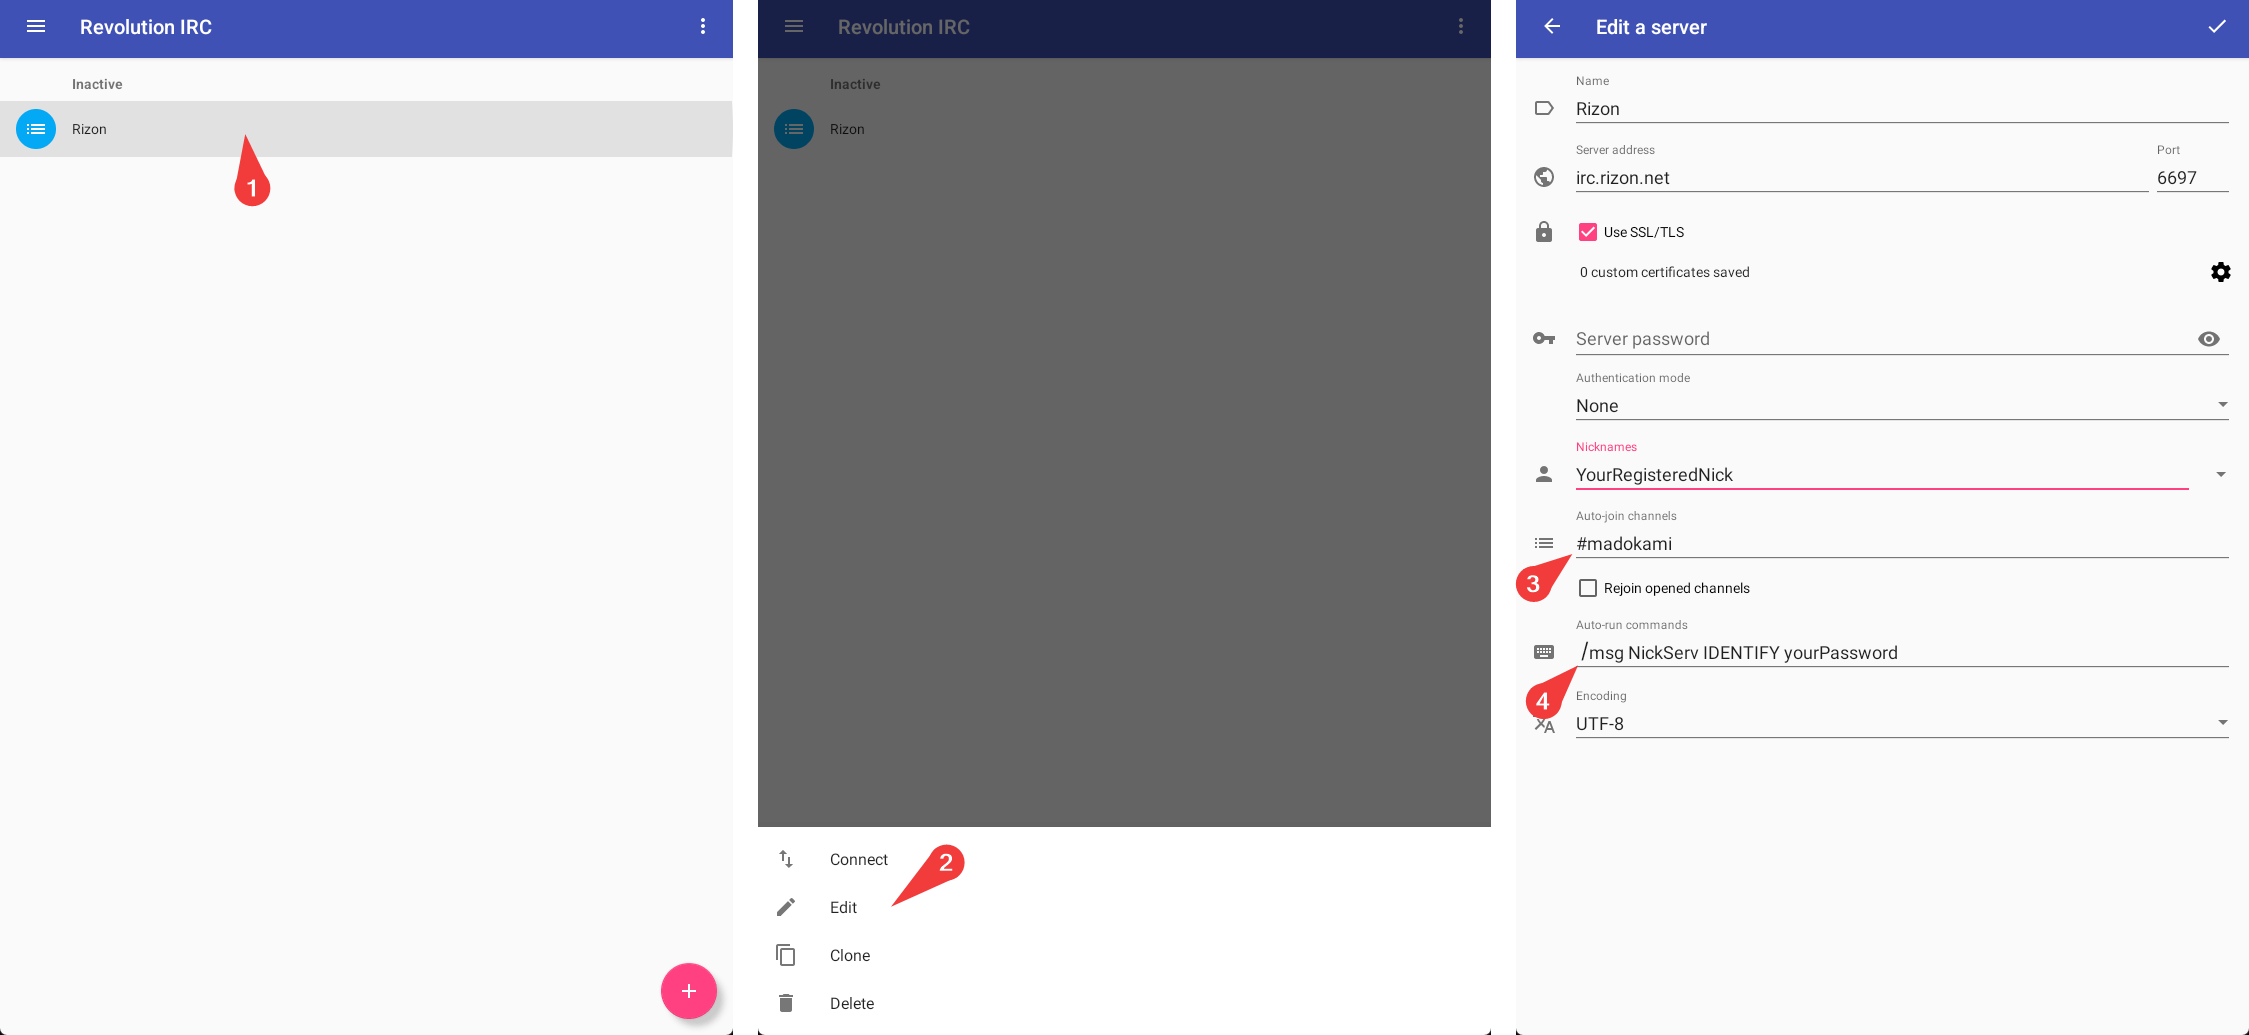
Revolution IRC
- Long press on the rizon network
- Click on Edit
- Add
#madokamiin Auto-join channels - Add
/msg NickServ IDENTIFY yourPasswordin Auto-run commands
Downloading Files
Free Manga Downloader 2
- Download and install FMD2 from here
- Update all the modules and restart FMD2 after the update is complete. You can check the update process in
Options > Websites > Modules - Then go to
Options > Websites > Accountsand add your Madokami credentials. After that select Madokami and click apply. - Set the number of downloaded files per task at the same time under
Options > Connections > Downloadsto 3. - Now go to Manga info and paste the URL in Input URL here and click
- After it loads the chapters, select the chapters you want to download and click Download
More FMD2 Settings
Auto Scan
You can scan a Madokami folder automatically.
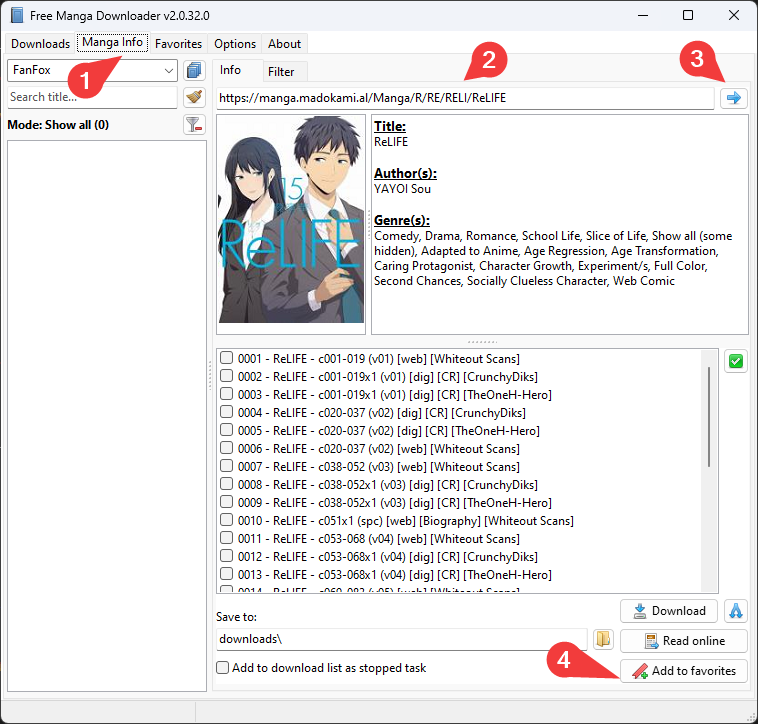
- Go to Manga info and paste the URL in Input URL here and click
- Click Add to favorites. It will be added in the Favorites tab
- Go to
Options > Generaland check Minimize on start - Then go to
Options > Updates > Favoritesand check- Auto check for new chapter at startup
- Auto check for new chapter in an interval. Default 60 should be good enough
- Automatically download after finish checking
Save as
By default, FMD2 will save it as folder. Go to Options > Save to > Save download chapter as and choose your format.
WEBP issue
Note that FMD2's module uses Madokami's web reader, which can't read .webp files, thus resulting in errors.
JDownloader 2
- Download and install JDL2 from here
- Go to
Settings > Basic Authenticationand click the Add button at the bottom - Now add the details
- Server type:
http:// - Host/URL:
manga.madokami.al - Username: [Your Madokami Username]
- Password: [Your Madokami Password]
- Enable Always checkmark (at the last column) to avoid errors while scraping files in Link grabber
- Server type:
- Now go to Link grabber and paste the folder url. It will scrape the manga files. It may scrape non-cbz files with websites path in the name. Sort the files on name basis and ignore those. Move the cbz files to a new package.
- Change the download settings to
- Max. Chunks per Download: 1
- Max. simultaneous Downloads: 3
- Now select the cbz files and right click. Then press Start Downloads
Mihon forks
- Add the Keiyoushi repo in your Mihon forks.
- Go to the extension list and search Madokami.
- Install the extension and go to its settings page.
- Add your login credentials.
- Now go to the Source page and click on Madokami to read/download the available manga.
WEBP issue
The Madokami extension by Keiyoushi uses Madokami's web reader instead of downloading the files like other downloaders (so that you can load the manga page by page). Madokami's web reader can't read .webp files, resulting in errors in Mihon and its forks as well.
iOS
You can access Madokami on Aidoku with the Community repo and Suwatte using the Seb repo.

