
This guide explains how to publish your comic using Cubari. Cubari does not host any files directly; instead, it reads a JSON file containing image links and other metadata. To host the images, we’ll use Image Chest, and to generate the JSON file, we’ll use the Kaguya script.
Cubari ≠ Cubari Proxy
Cubari and Cubari Proxy serve different purposes. Cubari Proxy is a scraper, while Cubari acts as a proxy that displays images from your own hosted sources.
Files and metadata
Files and folders
Your comic folder should follow this naming scheme:
- Folder names should be formatted like
V# Ch# Title. The volume number (V#) and chapter title are optional, but the chapter number (Ch#) is required. - Make sure the images inside each folder are sorted alphabetically.
Comic_Folder/
├── info.txt                    # Comic metadata
├── V01 Ch001 First Chapter/
│   ├── page001.jpg
│   ├── page002.jpg
│   └── ...
└── V01 Ch002 Second Chapter/
    ├── page001.jpg
    └── ...
Setup
Python
Kaguya is a Python-based script, so you need to install Python first.
- Download and install the latest Python release from here.
- During installation, make sure to check the option "Add Python X.XX to PATH".
Note: For this guide, I used PowerShell 7.5.1.
Kaguya
- Open powershell in the script folder.
- Run
python kaguya.py - Enter comic folder path.
- Choose options accordingly.bash
⬆️ Process Options: 1. Upload all folders 2. Upload only new folders (skip already uploaded) 3. Select specific folder(s) to upload/re-upload 4. Update GitHub only (uses existing manga.json for this manga) 5. Cancel - It will then start uploading in batch.
- After it done uploading, it will ask whether you wanna upload the JSON in the GitHub repo.
- When all the process is done, it will give summary.
Manual JSON Upload
- You need a GitHub account. An older account is less likely to be flagged by GitHub.
- Open a new public repo and upload the JSON file there.
- Go to Cubari and paste
https://raw.githubusercontent.com/user/repo/main/comic_title.jsonthere. It will load all your chapters along with their metadata.
The Cubari link generated on that page will be your comic’s final shareable link.
Generated files
After the run, the script will generate comic_title.json, imgchest_upload_record.txt and cubari_urls.txt in the comic's base folder.
| filename | Destination | Description |
|---|---|---|
comic_title.json | Comic folder | Will contain all the chapter links and metadata for cubari. |
imgchest_upload_record.txt | Comic folder | keeps track of all uploaded folders. If a folder fails to upload, it won’t be listed in this file. When you run the script again, the missing folder will be detected as new. |
cubari_urls.txt | Kaguya folder | Keeps log of all the uploads using Kaguya |
Mihon
- You can find the Cubari extension in these repositories. Follow the guide to install the extension.
- Then go to your phone: Settings -> Apps -> All Apps -> Tachiyomi: Cubari -> Open by default -> Add link.
- Check the links you want to associate. For this guide, you should enable
cubari.moeand*.cubari.moe, then tap Add.
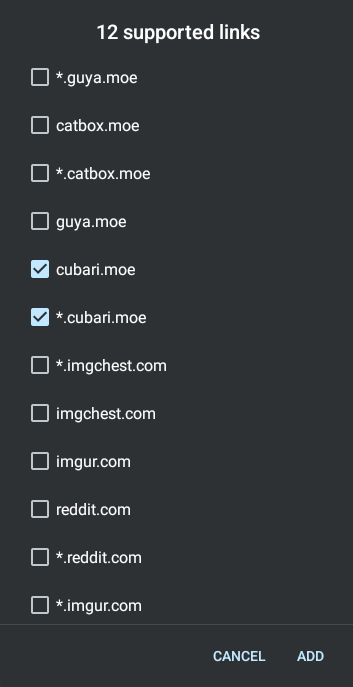
Your phone will now open selected Cubari URLs directly in Mihon using the extension.
README
Cubari behaves differently from typical extensions. It won’t display a catalog of manga inside Mihon. Instead, it will only show titles you’ve visited via this extension or those you've added to your library manually.